OSRS Zulrah Guide: Requirements, Forms, Rotations & Loot | Tons of XP Blog
The complete OSRS Zulrah guide. Covers requirements and travel, the three forms and their weaknesses, all four rotations with a rotation chart, prayer and gear switches, mechanics, and loot.
OSRS Zulrah Guide: Requirements, Forms, Rotations & Loot
Zulrah, the solo-only serpentine boss residing in the Poison Waste, is a popular and profitable PvM challenge in Old School RuneScape. Known for its unique mechanics involving phase changes, predictable rotations, and valuable drops, it rewards preparation more than gear. This guide covers everything from getting there to the four rotations and the loot table.
Requirements & Getting There
- Quest: Partial completion of Regicide (up to reaching Port Tyras).
- Skills: No strict requirements, but 70+ Ranged, 75+ Magic, 70+ Defence/Hitpoints, and 45+ Prayer (for Protection Prayers & Mystic Might/Eagle Eye) are highly recommended for a smoother learning experience.
- Location: Zulrah's Shrine, east of the Zul-Andra village.
- Travel:
- Zul-Andra Teleport Scroll: Fastest method, direct teleport.
- Fairy Ring: Code B J S (requires 76 Agility, boostable, for stepping stones).
- Charter Ship: Travel to Port Tyras, run south.
- Speak to High Priestess Zul-Harcinqa first to offer yourself as the sacrifice before you can board the boat to the shrine.
Death Mechanics: Dying at Zulrah is safe for items! Priestess Zul-Gwenwynig holds your items for a fee (100k GP after 50 KC, free before). Hardcore Ironmen will lose status on death here. Elite Western Diary gives one free resurrection per day.
Zulrah's Forms & Weaknesses
Zulrah cycles through three distinct forms, changing its attack style and weakness:
- Green Form (Serpentine):
- Attacks: Primarily Ranged. Can sometimes use Magic or alternating Ranged/Magic ("Jad Phase").
- Weakness: Magic.
- Blue Form (Tanzanite):
- Attacks: Uses both Ranged and Magic (Magic is more frequent/accurate).
- Weakness: Ranged.
- Prayer: Protect from Magic is generally recommended here.
- Red Form (Magma):
- Attacks: Melee tail whip (targets your tile, dodge by moving 2 squares away).
- Weakness: Resistant to both, but Magic is typically slightly more effective.
Memorizing rotations and switching prayers on the fly is exactly what trips up most beginners, so our Zulrah service has a vetted, hand-trained player handle the kills for you, fully watchable live.
Key Mechanics & Special Attacks
- Venom: Zulrah's Ranged/Magic attacks and Snakelings inflict Venom, a stronger form of poison. Use Anti-venom+ potions or wear a Serpentine Helm for immunity.
- Snakelings: Small minions summoned by Zulrah. Low HP (1) but accurate attacks (Melee or Magic). Use Ring of Recoil/Suffering to kill them passively or kill them manually during downtime.
- Venom Clouds: Dark green clouds spawned on the island. Standing in them deals rapid damage. Avoid these areas.
- Rotations: Zulrah follows one of four predetermined sequences of forms, locations (Middle, East, South, West pillars), and special attacks (Snakelings/Clouds). Learning these rotations is the core of mastering the fight.
Basic Strategy & Tips for Learners
- Gear: Bring both Ranged and Magic gear switches. Prioritize accuracy and damage for each style. A Serpentine Helm is highly recommended for learners to negate venom.
- Inventory: Anti-venom+ (if no Serp helm), Prayer potions, high-healing food (Sharks/Karambwan for combo eating), Stat-boosting potions (Ranging/Magic), Ring of Recoil/Suffering (for Snakelings), Zul-Andra Teleports (optional, for faster return trips).
- Identify the Rotation: Zulrah always starts Green (Middle), spewing clouds. Its second form determines the rotation:
- Red (Middle) -> Rotation 1 or 2
- Green (East) -> Rotation 3
- Blue (East) -> Rotation 4
- Use an online Zulrah rotation helper tool/image open while learning.
- Positioning: Stand in the correct spots for each phase as indicated by rotation guides to minimize running through venom clouds and be ready for the next phase. Pillars can sometimes be used to hide from attacks briefly.
- Prayer Switching:
- Green Form: Pray Ranged (usually). Switch during Jad phase.
- Blue Form: Pray Magic.
- Red Form: No prayer needed for tail whip (dodge instead).
- Switch prayers as Zulrah starts its attack animation.
- Gear Switching: Switch gear after switching prayers, as Zulrah dives between phases, giving you time.
- Dealing with Specials: Move away from Venom Clouds. Let Ring of Recoil handle Snakelings initially, kill them manually if overwhelmed or during safe phases. Dodge the Red form's tail whip.
- Focus on Survival: Prioritize correct prayers and positioning over maximizing DPS while learning. Don't be afraid to eat frequently.
Zulrah Rotations
Zulrah has exactly four rotations. Every kill opens the same way - green form in the middle spitting venom clouds - and the second form tells you which rotation you are in. From that point every form, position and special is fixed, so once you have the chart memorised the fight becomes a sequence of planned switches rather than reactions.
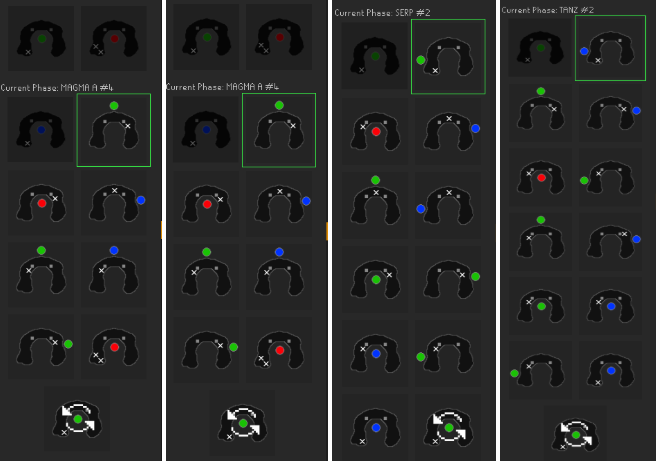
- Rotation 1 and Rotation 2 (second form: red, middle): Both open green middle → red middle and split at the third form, so you commit to the rotation one phase later than in 3 and 4. Read the third form off the chart and follow that column; both include a Jad phase on the east side where Zulrah alternates Ranged and Magic and you switch prayer per attack.
- Rotation 3 (second form: green, east): Identified immediately by the green form surfacing east. The longest rotation with the most green phases, so bring the extra prayer potion and expect the most snakelings.
- Rotation 4 (second form: blue, east): Identified by the blue form surfacing east. The most Magic-heavy rotation, so Protect from Magic and your Ranged gear switch get the most use.
Reading it in the fight: pray Ranged on green (Protect from Magic during the Jad phase attacks as they come), Protect from Magic on blue, and no overhead on red - step two tiles away from the tail whip instead. Move to the next tile before Zulrah surfaces, switch prayer, then switch gear while it dives. Most modern clients have a rotation helper plugin that highlights the next tile and prayer; it is worth using until the chart is second nature.
Notable Drops
Zulrah is a consistent money maker due to its regular resource drops and valuable uniques.
- Uniques (Approx. 1/128 for any): Tanzanite Fang (Toxic Blowpipe), Magic Fang (Trident of the Swamp), Serpentine Visage (Serpentine Helm), Uncut Onyx.
- Tertiary: Pet Snakeling (1/4000), Jar of Swamp (1/3000), Tanzanite/Magma Mutagens (Very Rare).
- Common: Zulrah's Scales (100% drop), high quantities of noted resources (Pure Essence, Flax, Yew/Mahogany Logs, Coal, Adamantite Bars, Dragon Bones), runes (Death, Law, Chaos), herbs/seeds (Snapdragon, Torstol), Manta Rays, Antidote++.
Conclusion
Zulrah is a challenging but learnable boss. Understanding its forms, weaknesses, and predictable rotations is key. Start by focusing on one rotation, use helper tools, prioritize survival, and don't get discouraged by early deaths. With practice, you'll master the venomous serpent and reap its substantial rewards.
Ready to tackle Zulrah but need better gear or stats? Check out our Zulrah kill service for expert help, or our OSRS skilling services for the Ranged and Magic levels.